So, my Etsy shop is approaching it's 2nd year anniversary and I couldn't be more proud of it. I love making my items and sending them out. I have been so dedicated to it since I've started and all my hard work has paid off. I have to say that I am very proud of myself as well! I hope you find these quotes as inspiring as I did! Sometimes we just need a break and a little pick me up time and again to keep on going, but what is important is that you never give up!
Showing posts with label Craft. Show all posts
September 7, 2013
August 4, 2013
New Items and New Craft!
So I thought I had the day off yesterday but it turned out that I was scheduled to work. So quickly after I finished making these babies, I had to hurry and get ready to go to work and I was out the door. They are really pretty and sparkly. My phone camera doesn't do a very good job of showing that and I will have more pictures for this listing in my Etsy shop soon. Click on the picture to learn more info on how to get your fingers are these pretty sparkly rings!
After I got home from work I started on this guy! I love making notebooks and I have made them before in the past but it has been a hobby long forgotten. I think it's about time that I picked up this craft again because I fell in love all over again last night with this notebook. Hopefully, I will have time to work on some soon and put some up in my shop for sale as well. I will also have to work on a DIY for the next one that I make. I always, always, always forget to take pictures while I'm crafting so I can make DIY later. It is such a bad habit!
Well that is pretty much all I have been up to lately, other than work!
Related articles
June 5, 2013
May 25, 2013
New Laser Cut Necklaces!
Google
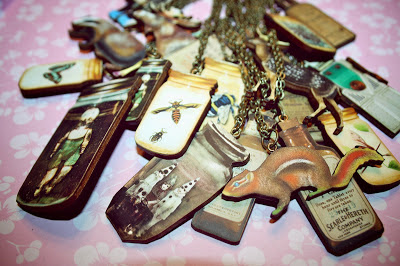
I have been dying to make this post since I ordered the supplies to make these necklaces! I am so excited to share with you the newest additions to my Etsy shop! Laser cut acrylic and wood charm necklaces! When I received the supplies in the mail I assembled all 70+ necklaces in one night! It took me about three hours but that just shows you exactly how excited I am about these adorable new creations!
Of course I took pictures as I was going!
I want to say that I am about 2/3 of the way to adding them to my shop already too. If you are interested in one of these necklaces and click on a picture and do NOT see it in my shop please send me a convo and I will let you know if it has been listed yet or sold already. Maybe I can reserve it for you!
I have a feeling that these babies will be my hot new item for the summer and will go pretty fast though!
I LOVE THEM!
Please feel free to share them on facebook and pinterest! The buttons are below!
I hope you love them as much as I do! I think the majority of them will be perfect for Halloween!
May 4, 2013
13 Adorable DIY Tutorials Roundup!
Google
Click the image of the tutorial to be taken to the original bloggers instructions!
1. Cute little Hair Bow Tutorial
2. Holiday Ornaments turned to Accessories
3. DIY Terrariums
4. How to sew Ruffles
5. Funfetti cake mix
6. DIY Camera Neck Strap Tutorial
7. Handmade Envelope Tutorial
8. DIY Curtains
9. DIY Stuffed Dino for Children
10. DIY Beaded Chandelier - Very Chic!
11. DIY Messenger Bag Sewing Tutorial
12. bokeh filter for your Camera Tutorial -
Create some really amazing images!
13. Marquee light DIY Tutorial
Related articles
Have you seen my DIY Coffee Table?
Google

My best friend Samantha from Rhode Island (who lives in Port St. Lucie) came for her regular birthday visit we make every year so we can see each other. Together we set off on the task of decorating my coffee table.
I am a cutter. By cutter I mean that if I see something that tickles my fancy in a magazine or else where I CUT - IT - OUT like Uncle Joey. The pictures you see here were accumulated after years of clipping!
Top View:
I inherited the coffee table from a family friend while helping him and his boyfriend move. Samantha and I laid out the pictures how we wanted them. We kept circling each other until the entire surface area was full. Then came the Mod Podge! We poured it on to the table liberally and spread it out with sponge brushes. We waited until it dried. Then we moved on to the Epoxy!
Close ups:
You can find clear drying Epoxy at any craft store. There are two chems you mix together and quickly pour that will harden like you see in the pictures. Luckily for me the table already had a lip or edge because if it didn't I would have probably had to make my own with painters tape or duct tape.
Over all I think the table came out really great. The best thing about this table is the fact that I can always change it. There is still room for another layer of pictures and Epoxy if I should choose to change it!
I really tried to incorporate my personality into the table. It shows all the things that I love. The things that make me feel nostalgic and all the things that I am interested.
This is the most massive collage I have ever made. It is also the biggest cooperative project I have ever made before! Making this table with my best friend Samantha is one of my fondest memories of her and the best thing about the table is that I will have it forever!
I hope you enjoyed my Coffee Table because I know I do :)
Related articles
Subscribe to:
Posts (Atom)